WordPress architecture consists of two types of contents, the posts, and the pages. There are two methods for publishing content on WordPress, either through pages or posts. Though the two structures look similar, each plays a different role, but in a complementary manner. Do you know the difference between posts vs pages in WordPress?
The elephant in the room for the beginner has always been how to tell the posts and pages apart. With that in mind, let’s delve into each content unit’s functions, the similarities, and the difference between them. We will also look at each of their strengths and weaknesses and when it’s convenient to deploy one over the other. Furthermore, we shall explain the basic WordPress concepts you should know before designing your website.
At a glance:
- WordPress posts are timely blog posts that have a publish date
- WordPress pages are timeless static content which doesn’t have a publish date
What are posts?
Posts are the web content that is listed in sequential order. It means that the latest will be on top when you post new content, while the later will go under it in that order. You can organize your posts with categories and tags. Categories and tags are structural bits of metadata that you build as preferred to tie interrelated posts together. The categories and tag tasks are composed on an Archive Page.
What is an Archive page?
An Achieve is a collection of information based on grouping together of posts that have a thing or two in common. WordPress usually spontaneously creates one or more of the following Archive Pages:
- Category Archive: This is an archive of posts in each category.
- Tag Archive: This constitutes an archive of posts in each tag.
- Date Archive: Indicates an archive of posts by date.
- Author Archive: This shows an archive of posts for each author.
Based on the above posts Archive pages, WordPress displays a list of associated posts typically in date descending order. It also generates an RSS feed for all your posts. Additionally, it also creates individual feeds for each Archive Page.
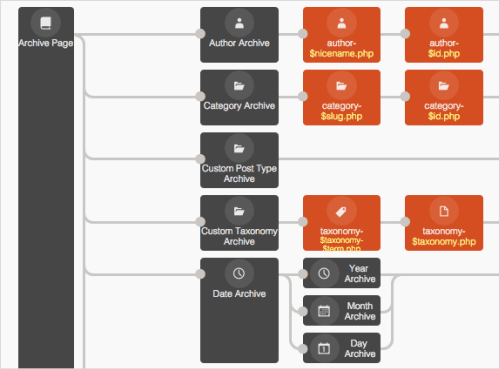
Posts are generally created in the WordPress admin area, after which they are allocated to a category. WordPress generally does the whole intricate process of positioning and managing where the post appears in your archives as indicated in the diagram below:
What are the structures of a post?
A post consists of several structures, these are:

1. Post Title: This is where the reader can access what the WordPress post is about. A well-crafted title is an attention grabber, which means it’s most likely to entice visitors to your page to read the post.
2. Date published: The date the WordPress post was published is displayed at the top of the postdate of the post.
3. Written by: This is where the name of the author of the post is captured. Unless your display name is changed, the username is spontaneously displayed.
4. Comments: Every time you write a post, it’s essential to draw the readers’ feedback. The comments section is where the readers leave their comments, whether positive or negative. All themes essentially have a link to comments.
5. Your post content: these are the main ideas you put out for your readers to reflect on. It’s merely the conduit of information.
6. Categories: are generally used to assist the readers in finding posts on your websites. They often act like chapters of a book. They offer a broader outline of the issues you write about.
7. Tags – Help readers locate posts on your site. They are more like the directory where the subject can be exploded into a million bits for easy reference pick by the reader.
What are the pages in WordPress?
Pages are static; hence they are not listed by the publish date. They do not have an expiry date since they are meant to be there for the long haul. An example of pages is the About pages and the Contact pages. The About pages inform the visitors what the website is all about, while the Contact pages show the telephone numbers, emails, and the physical address.
This information can assist the visitor on how they can reach the website’s users, in case they want to transact business or make inquiries.
You can organize WordPress pages in the following ways:
How can I organize Pages hierarchically?
In WordPress, associated pages are grouped under the parent page. They then become subpages and hence make a logical section of your site. The parent page thus becomes part of the URL for the subpages. For example, if you have a page that includes information about your staff, the URL could look anything like below:
http://wordpress.com/about/staff/
Consequently, the page that has information about the company history, the URL will look as below:
http://wordpress.com/about/history/
The above has some SEO rewards because Google and other search engines can notice that pages in a given unit are associated with the page addresses’ structure.
How to organize Pages by Menus?
Pages can also be structured by insertion onto the WordPress custom menu. Your theme controls the menu position. In most cases, themes comprise a primary menu that appears near the top of your site. By adding your most vital pages to the main menu, you can guarantee that visitors will find it.
The least essential pages can be located on secondary menus. Most themes comprise footer menus or utility menus. Using a WordPress menu widget, you can make additional menus to any sidebar location. Menus form a crucial part in that pages can be structured and presented to your visitors. They are the foundation pages containing crucial information that rarely changes. This is the information you need your visitors to find effortlessly.
You can use the front page function when you want to publish your posts on a page other than the home page. All WordPress posts are, by default, published in the blog. In WordPress Post vs. Page, the best way to go about it is to publish most of your content as a post, instead of creating a page every other time.
It’s clear by now that when you post content on your blog, they are archived based on the time, month, and the year they were posted. Finding an achieved post is not easy. To categorize the content, you should label a tag on each. Subsequently, since blog posts have a date and timestamp, they’re effortlessly fed to RSS. In this way, the newest posts can be availed to readers when needed.
The comment section is another crucial part of using a post format. Consequently, readers can make inquiries and answer each other’s questions. It can fundamentally increase the value of your content.
Useful Read: How to Create Multiple Blog Pages in a Single WordPress Website?
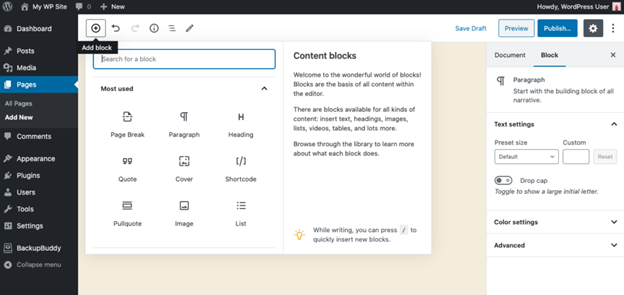
1. How are Website’s Pages created?
When you create your WordPress page, go to your dashboard: Pages and Add New. This will take you to the WordPress Block Editor. This will allow you to build your page, using blocks that represent various types of content. The process is captured below:
(A) Create your page title:

Right beneath, select the + symbol labeled Add block. Having completed the above process will display a list of the available blocks. Choose a Heading block to enter a heading and a Paragraph block where the text is entered. In your editing bar over the typing window, you can see some text formatting options, like text style, alignment, the ability to add links, among others, that you can access by clicking the icon with three vertical dots.
Other options for that block, like tweaking its font size and color, are displayed on the right sidebar. Press Enter to add block right below it. You can now insert an image block.
To upload an image to your website’s Media Library:
- Select an image in the Media Library.

- You can also opt to create a link to an online image that you want to use.
- Once the image is added, new settings will appear in the right-hand sidebar.

- Change the image dimensions and add ‘alt’ text for search engines and visibility.
- Move blocks up and down to rearrange them and use the Columns block to create a multi-column layout.
Other options that you can deploy to customize and manage your page are:
- Select the Document tab in the right sidebar to show settings that relate to the page as a whole
- Customize the page’s URL (its ‘permalink’)
- Add a featured image, and enable comments
- You can now use the preview button at the top of the editor to see the format of the page on the front end.
- Press the Publish button to activate it, which will automatically save it as a draft.
- The above notwithstanding, you can later make changes to it as you wish.
(B) To create a subpage:

1. Go to Admin >> Pages >> Add a new screen.
2. Once you are there, on the right menu, click on the Parent Page on the menu drop-down. The drop-down menu consists of a list of all the Pages previously created for your site.
3. Select the suitable parent Page from the drop-down menu to make the current page a child Page.
4. You can thus Add content to the subpage.
5. When the above process is done, click Publish.
When the pages are listed, the Child Page will be located under the Parent Page. The Permalinks of your pages will also replicate this Page hierarchy.
Changing the URL of Your Pages:
When you want to change your URL part (also known as a slug) comprising your Page’s name, you can use the Edit button under the Page title on the Edit screen of that particular Page, accessible from the Page’s tab of WordPress Admin Screen.
Creating a List of Pages:
WordPress can spontaneously create a list of pages on your site within the sidebar or footer. You can also procure WordPress plugins that can help you display a list of pages within posts and other areas of your WordPress Themes.
(C) Page Templates:
Individual Pages can be set to use a specific custom Page Template, for example, a WordPress Theme PHP template file like my-custom-page.php. that you can create within your Theme. The new page template will then supersede the default page.php page template composed of your theme.
1. How do I choose my Home Page?
When your site includes both pages and posts, you can choose whether you want your page to display static content (a page) or a list (index) of your most recent posts. Either option you select depends on your site’s focus. If you want to pay attention to your blog, news articles, analyses, or other related and typically time-conscious content, it’s essential to have your posts in front and at the center.
This is the default structure for a new WordPress site, which reveals its origin as a blogging platform.
If you don’t have a blog or want your posts to be only one part of a larger site, it would help to create a static home page instead.
To set the type of home page you want, simply head over to Settings, then, Reading from your WordPress admin sidebar:
The first setting you find on that page is labeled Your home page displays and has several choices. The first choice, Your latest posts, shows an index of your up-to-date posts, typically as excerpts with links to the full posts. If you select A static page, select which WordPress page you want to use as your home page in the Homepage field.
2. How do I add WordPress posts?
Adding posts to your WordPress can take the following format:
- Go to posts and Add New:

The screen will now look as familiar as when you were building WordPress post content, which is identical to the process we explained above for creating pages.
When you want to create posts, you will notice that the Document tab’s options in the right sidebar have changed. This includes two different settings, the Categories, and Tags. These two settings allow you to organize your posts.
Categories allow similar group content, while Tags are words or phrases that describe a post’s content more explicitly. Further to the above, if you look at your WordPress dashboard’s left sidebar you will see that there are sub-tabs for Tags and Categories under the post tabs.
When you go back to the post editor, you will see a Featured Image section. This is where the image you uploaded will be included in the post. This location is determined by your theme and a thumbnail version of the image that appears on your blog archive and search pages if your theme permits it.
Lastly, you’ll see that comments are enabled by default under Settings >> Discussion. Nevertheless, you can decide to turn them off.
How many posts and pages can I have on my WordPress?
The number of pages and posts that you can have on your WordPress is limitless. Google ranking is mostly determined by the amount of content you have on your website, and the more you have, the higher the chances of getting a better ranking.
Should I use pages or posts?
In WordPress, it’s of the utmost importance to know what moment you can use a page or a post. This is because both content types have different scopes and roles in a WordPress website and blog. Posts and pages can be used jointly or separately.
When you decide to build a website with a blog integrated into the website, you should use a mixture of both. But when you want to deploy static content that rarely changes, like our Contact us page, you can only use pages. For the blog, where you put out a series of data content, you should use posts. Posts can also be used if you are using WordPress as a blog, diary, or some journal.
Big corporates, especially ones that deal in software engineering, typically deploy both posts and pages. Their pages include particulars about the company and about their products and services and posts for their blog where they publish updates for their clients and news about the company’s accomplishments.
There are other settings options which you can find on the Setting >> Reading page. You can customize the number of posts and how much of the post content to show on the index and archive pages. Remember to press the Enter button upon completion of the above process to save the changes.
The WordPress Architecture of post Types
In addition to posts and pages, the WordPress platform has other built-in post types. The design and the name post type indicate that WordPress’s start as a blogging platform. Pages were formed as another type of post with different properties. Below is the list of all post types that WordPress includes out of the box:
- Posts
- Pages
- Attachments (images, files in your Media Library)
- Revisions
- Navigation Menus
- Custom CSS
- Change sets
NB: Most of the above post types work in the background, and you won’t need to think about their post type properties except if you’re a developer.
What are the differences between WordPress posts vs. Pages?
WordPress has two straightforward ways: by default, WordPress can create two types of contents; these are posts and pages. When adding new content to make your site as user-friendly as possible, you should know how to use the posts and pages to add new content accurately. Since the two content units come across as similar at times, let’s ventilate when you can use a post and when a page is appropriate.
- What determines when you should use posts and when you should deploy pages
- Some more distinct differences between WordPress posts vs. pages to enrich your knowledge.
Here are WordPress Posts vs. Pages differences:
POSTS:
Blog posts appear in reverse chronological order; the most recent WordPress post is the first post that your readers see. It means that when you want to write a blog post, the appropriate content level to use is the post.
PAGES:
Normally used for information that you want to share with readers but don’t expect to update frequently, this information is usually static. It does not want constant updating since it requires people to see it as it is continuous.
At a high level, that’s the most significant difference:
- WordPress posts are for timely, dynamic blog posts that have a publish date.
- WordPress pages are for timeless static content that does not have a publish date.
Other than the above, there are other smaller differences between the two. These notable differences have an impact on how you can structure your site:
1. While you can Categorize posts, Pages Are Hierarchical. WordPress post can be assigned to either by:
- Categories
- Tags
The above can organize your WordPress posts and make it easier for the readers to find the information they are looking for. The Category and Tag archive page lists all the blog posts suitable for that category or tag by their publish date.
Incidentally, Pages cannot use categories or tags. In its place, they’re structured hierarchically. This means you can create a parent page and the other a child page. This enables you to group associated pages.
When you make one Page, a child of a parent page, it mainly affects its URL permalink structure. For example, if the parent page is situated at wordpress.com/parent, the child page would have a URL of wordpress.com/parent/child.
2. posts Typically Show a Public Author; Pages, On The Other Hand, Don’t
In your WordPress dashboard, you’ll see an author for both posts and pages. However, on the public part of your site, some themes only show an author for posts. The writer can click on the post author to look at a list of all the writer’s posts. Pages, on the contrary, don’t list a public author.
3. Posts Appear In Your RSS Feed, But Pages Don’t
Your site’s RSS feed allows your readers to subscribe to your content using something called an RSS reader. Your RSS feed only displays your site’s up-to-date posts. The pages are excluded.
The RSS feed is necessary because it helps readers subscribe to your newest content. This indicates, as stated before that pages are static while posts are dynamic timeless content.
4. Posts Have Custom “Formats,” But Pages Oftenly Have Templates
Fundamentally, this makes it easy to style your post differently depending on the type of content. Typically, you’ll have formats for things like:
- Image
- Video
- Quote
- Gallery
- Etc.
Pages don’t have these formats. Nevertheless, some themes will comprise Page Templates that allow you to apply diverse layouts to different pages. This feature is not as common as post-formats, though.
Tips to Create Eye-Catching WordPress posts
Social media is the biggest blessing to SEO, Twitter, and Facebook accounts have made it possible for people to share content like never before. These tools make it easier for people to read your blog posts. Nevertheless, don’t overlook the importance of your heading like in the past.
The reason is straightforward – at any given time, when someone tweets your article, the first thing that people see is your Headline.
1. Headline:
A good headline, therefore, will lead to people clicking on it to read your blog, or it will be the biggest turn-off, and no one will bother to see what is under such a headline. Remember, the only single item you can weaponize is the Headline; there are no pictures to entice your customers, nor well-punctuated text that can attract the reader to your blog post.
Subsequently, what are the best Headline features that can make people click through to read your text? The following six pointers will make your title clickable:
- Eye-catching: The trigger words are your best weapon that will help you catch even the discerning of eyes. Deploy words like Free, Win, and Sale, which are perfect words for selling products. When dealing with international posts, use words like Top 10 or 5 reasons why or even How to sound obvious and can be quite the looker.
- Believable: Deceptive headlines are a No! so don’t find yourself putting out beautified headlines that can’t deliver when clicked. There is nothing as bad as losing clients just because you lied; it’s even more injurious because such people may never return.
- Easy to read: Strange fonts that don’t speak to what you are advocating for can put off people. It would help if you made your Headline easier to read, and therefore entice people to click on it.
- Active voice: Using an active voice is perfect for a heading. In other words, instead of using headings like 10 Ways to be a millionaire, make it active by saying 10 Ways to Generate Millions of Dollars.
- Brief: Long titles are bland and quite a turn-off. The Headline should be short but sweet like a good skirt. Deploy brevity, especially since Twitter caps the number of characters that you can use.
- Accurate: Ambiguity feels good in prose fiction, but this is SEO, and there is no room for that. Your readers need to get what you are talking about beforehand.
Also Read: How to Turn One Blog Post into Multiple Pieces of Content?
2. Deploy best aspects of brevity:
When writing content for your blog, you should bear in mind that your customers want to get straight to the point from the word go. Therefore, if you want your content to be shared, it must not send your audience to Boredom Island.
Below are three elements to put into consideration when writing your blog post:
- Concise writing is the seal of assertive and cost-effective communication. It’s possible to whittle down your content by up to 20 percent or more without losing content value.
- Word count is important, but every word that you use should strengthen the script. Write the script and work on word count later.
- It takes more work to write a short WordPress post. You may find yourself spending a lot more time to edit than you do writing.
Quality is always of the essence when creating content. Consider the tips below when you want to churn out content that is well written, readable, and brevity-conscious:
- The shortest message always gets the quickset home run. Text chunking does not work for a straightforward reason: attention span. Most people have short attention spans, that’s why the more proficiently you put your point across, the more attention you will get.
- Phrases can help you in writing about complex ideas, other than writing lengthy content. You can make fair use of phrasebooks to find smaller words and expressions to write about complex ideas instead of writing lengthy content.
- Bullet points, headings, and subheadings can allow your readers to skim your article more efficiently and decide as per its content value when used in the right way.
3. Use Best Practices for Images in Your Blog posts
When you are a writer, your main objective is to write captivating pieces that will make your readers hang on to every word you put across. But with the emergence of a readership that is restless and time conscious, you must rethink your strategy and incorporate images in your writing. Netizens want quick, accurate information. They do not have the patience for indigestible content that is of little or no value for them.
This way, you should use images as supporting tools that can turn your content from boring to exciting. Therefore, if you are a writer and you have made a decision to be obedient to your calling of only using texts without images, let us show you why your site is not directing traffic and converting enough:
- Break up the text
Images can play a significant role in separating points, to make the text easier to comprehend. When you are doing lengthier articles, you should use images to keep the reader interested enough to read the otherwise long text. The text with images is substantially more comfortable to read and understand.
- The images you use should be clear.
Use self-explanatory images that are of good quality and not blurred. If the writer can’t be concerned about getting good- quality images, they may be creating low-quality content, too. Hence, while the use of images is essential, you must use high-quality ones as well. Using low-quality images is just as bad as not using them at all.
- Utilize legal images
Don’t use copyright images because they may get you into unnecessary litigation and become costly in the long run. In most cases, the use of a free image will require you to say who produced it or where you got it from.
- Finally, with those few pointers, it’s our hope that you will improve your site for the better. Try and think like your visitor, and use the above to put in place the best website where they will land and decide to make it their home.
How can I use the Blog Designer PRO Plugin to design my blog post and blog pages?
Blog Designer PRO is equipped to manage and design your blog page uniquely. It arms you with advanced tools that will enable you to modify and redesign your blog page layout and design based on your preference. With an array of 50 very attractive blog templates on its war chest, it is 100% compatible with a host of popular WordPress themes and page builders.
The plugin has a user-friendly interface and hence does not require any coding skills. It allows you to switch the layout anytime as per your liking.
Importance of blog post and blog page design using Blog Designer PRO
With 600 million blogs and 1.7 billion websites out there, it is not easy to get noticed. That’s why you require an excellent blog post and blog page design. You can achieve this by using a competent plugin like the Blog Designer PRO. It will help you achieve a beautiful and responsive blog design displayed correctly on various devices, including laptops, tablets, and smartphones.
The Blog Designer PRO will help you to quickly design your blog’s posts and pages to make them attractive to your visitors. If your blog is stylish and unique, it will draw attention, with clicks and conversions. Hence, your blog will become a success.
The best way to elevate your blog above the competition is to project a fresh look. The Blog Designer PRO plugin will enable you to redesign your website often without asking for help. Redesigning your blog shows your readers that you are not stagnating, and it keeps your blog modern and up-to-date.
Blog Design PRO Features:

Here are the critical Blog Designer PRO features that make it the best plugin for designing blog posts and blog pages:
- The Plugin is fully Responsive: its templates feature the responsive design making your blog posts and pages to display properly on various screen sizes. Google and other search engines are known to rank responsive blogs in their search results.
- Cross Browser Support: Blog Template compatibility with standard web browsers like Firefox, Chrome, Safari, Opera, etc.
- Social Share Buttons: social media is important to a blog because it helps generate your brand awareness, leads, sales, and revenue. The Blog Designer PRO plugin has some very progressive Square/Circle social share buttons integrated which allows the user to share posts on Facebook, Twitter, and WhatsApp.
- Manage Posts Per Page: This user-friendly feature allows the user to manage several posts per single page for the blog.
- Show/Hide Features: The interface equips the user with the ability to show/hide a post category, tags, author, and comment count of the posts as per the design.
- Multiple Post Category Selection: Allows the user to choose several post categories to display category wise posts.
- Multilingual Translation Ready: The multilingual interface enables the plugin to be translation ready; thus, eliminating language barriers.
- Alternative Background Color: Allows the user to choose other colors for posts, thus displaying the post’s alternative background.
- Post-Content-Length: It helps retain post content size as summary text or display full depiction on the blog page with posts.
Related Read: How To Manage Blog With Blog Designer Plugin [Beginner’s Guide]
Conclusion
When you are building your first website, it’s essential to understand how and when to deploy posts and pages. You will realize that these are the website’s building blocks that you will use to entice your visitors to land on with an expectation to convert them into your regular audience. Remember that the more work you put into your website, the better results you will get in terms of the returns.
Finally, it would help if you keep updating your old content to conform to the dynamics of technology and emerging trends. It will even benefit you more if you continue publishing new and fresh content, which will help Google ranking and conversion of traffic that lands on your entrance pages.